Home  ›  What's new

What's new in ServisBook

New features and improvements by month. For each one you will find what it is for and where to look.

November 2026

Filter orders by appointment date and sort them by the next visit

The order list can show only the orders that had a visit in a given period and sort them by where you are going first. You can find last month's order even without knowing its name. You will find it in the Orders list, the Appointment from and Appointment to fields and the Sort by choice.

Show detailsHide details

The date filter also catches a multi-day installation that started earlier and only reaches into the period. You can sort by latest activity, by creation date or by the next appointment; orders without a future appointment come last in that sort. The filter and the sorting stay in the page address, so you can send the link to a colleague, and they can be saved in your own view.
Email the report to the customer right after closing it

After you close a report, the app offers to send it to the customer. The e-mail with the PDF attached has the address of the branch contact pre-filled, otherwise the customer's, and goes out with one click. For every report you then see whether it was sent and where.

Show detailsHide details

In the dialog you can remove and add addresses, tick Send me a copy too and read the subject and text in Message preview exactly as they will go out. Do not send sends nothing and you can send the report later. The sending status is shown for every closed report on the Documents → Reports tab, and from there it can be sent again or to another address. The order log records who sent the report to which address. You can edit the subject and text of the e-mail in Settings → Advanced → Automatic emails.

Full-screen calendar and colleagues' changes without reloading

The calendar has more room on screen, and the Expand to full page button stretches it across the whole page, for example on a large monitor. Changes made by a colleague appear by themselves in all three views, without reloading the page. Just in case, there is a Refresh button next to it.

Show detailsHide details

Only one bar is left above the grid: the technician filter sits right next to the month name and less frequent options such as Schedule all are in the Calendar menu. In the expanded view the menu and the top bar disappear, the Esc key takes you back and you can send a link to the expanded view to a colleague. The technician schedule fills the full height of the screen when expanded. The calendar also reacts to new proposed appointments and deleted personal events. On the phone the calendar stays as it was.

ServisBook in English

Every user can switch the app to English, for example a technician who does not speak Czech while the office keeps working in Czech. The whole interface, the manual and the service reports are in English. You switch the language in the menu under your name, the Language option.

Show detailsHide details

The choice is saved to your account, so it also applies when you sign in on another device. You can switch it on the sign-in and sign-up pages too. A report is created in the language of the person who closes it, and prices stay in Czech crowns. Templates and labels you named yourself in the app are not translated. The website has an English version too, at servisbook.com/en/.

October 2026

Service reports with your logo, stamp and a live preview

Reports are now built in one editor that shows the resulting PDF straight away. Upload your company logo and stamp and the report prints them in the header and by the signatures, together with the company ID and VAT number of the supplier and the customer. You will find it in Settings → Service reports, Report appearance card.

Show detailsHide details

A new template only needs a name and the editor opens right away. Content blocks are switched on with Show, their order is changed with arrows, and for tasks you pick the columns and the total. On the right is a live preview of the real PDF with sample photos, so you do not have to try anything on a live order. The template technicians should get first is marked Offer first. Your company ID and VAT number are filled in under Settings → Basic. Templates you already have open in the same editor; finished reports stay as they were.

A customer's branches under one company ID

A chain or a company with several premises is kept as one customer, and its branches as work addresses, each with its own contact person, phone and e-mail. Importing from Excel turns further rows with the same company ID into branches instead of dropping them. You can then find the customer by a branch name or by an address too.

Show detailsHide details

On import, the customer gets the contact person from the first row and every further address with the same company ID is added as a branch with the contact from its own row. For a customer already in the app, the branch is added as a new address and empty contacts at existing addresses are filled in. When you create a customer by hand and another customer in the app already has that company ID, the form tells you so and offers the link Open the customer and add a branch. Searching by branch works in the customer list, in the search in the top bar (Ctrl+K) and when choosing a customer in the New appointment dialog.

Every customer address has its own contact person

A customer with several branches, warehouses or premises has its own on-site contact at each work address: name, phone and e-mail. The technician then calls the manager of the branch they are going to, not head office. The contact shows on the order, in My day, on the appointment card in the calendar and in the service report. You fill it in at the work address on the customer card in the Customers section.

Show detailsHide details

All contact fields are optional and an address without a contact uses the customer's contact as before. If you fill in at least one field at an address, the whole address contact applies, so the branch manager's name does not get paired with head office's phone number. E-mail is treated separately: if the address has none, the customer's e-mail is used, for example to confirm a proposed appointment. On the customer card the contact is under the address, and the phone and e-mail are links you just tap. An external technician sees the contact at the addresses of their own orders but cannot change it.

An external technician sees only the orders you send them to

Add a subcontractor or a temp as an external technician. In the app they see only the orders they are assigned to; they do not see the customer list or the rest of the company. If they are to work with a colleague, the admin can let them read the orders of selected technicians. They are created in the Technicians section with the External technician – assigned orders only permission.

Show detailsHide details

On their own orders they work like a technician: changing the appointment status, logging tasks, uploading photos, filling in checklists and reports. They do not create orders, appointments or proposed appointments, and can only read the customer. Their menu has My day, Orders, Calendar, Day map and Equipment. Of the company they see only the name and phone number of the admin and colleagues, so they know who to call. Until you assign them an appointment, their My day is empty; that is not a bug.

Schedule an emergency from a new customer in a single dialog

A new customer calls and needs a technician today. In the New appointment dialog you type the customer's name, choose Create new customer and add the phone number and the site address. One confirmation creates the customer, the order and the appointment. The fields also search without diacritics.

Show detailsHide details

The Customer field is above the Order field in the dialog, and you can find an order by the customer's name too. Whatever is about to be created is marked in the dialog with the "new" label, so it is clear what will be created. Instead of a fixed appointment you can also send the customer a proposed appointment for approval. The dispatcher does not have to jump off to Customers and Orders during the call and ends up with a scheduled job on one screen. A company that has no orders yet gets a Schedule appointment button right in the empty calendar.

Upload customers from Excel or Pohoda

When moving to ServisBook you do not have to retype your customers by hand. Upload an .xlsx or .csv file, for example an address book export from the Pohoda accounting software, and you see a preview before saving. Repeating the import does not duplicate a customer, and at the end you get a list of addresses that could not be found on the map. You will find it in Settings → Customer import.

Show detailsHide details

The procedure has three steps: download the template, upload the file and check the preview. The template has the same columns as the address book export from Pohoda and only the company name is mandatory. The preview shows how many customers are new, how many will have empty details filled in and how many stay unchanged. Rows with the same company ID (IČ), or with the same name and town, are merged into one customer. If the import is interrupted, just run it again and nothing is duplicated.

The Today screen shows what is happening right now

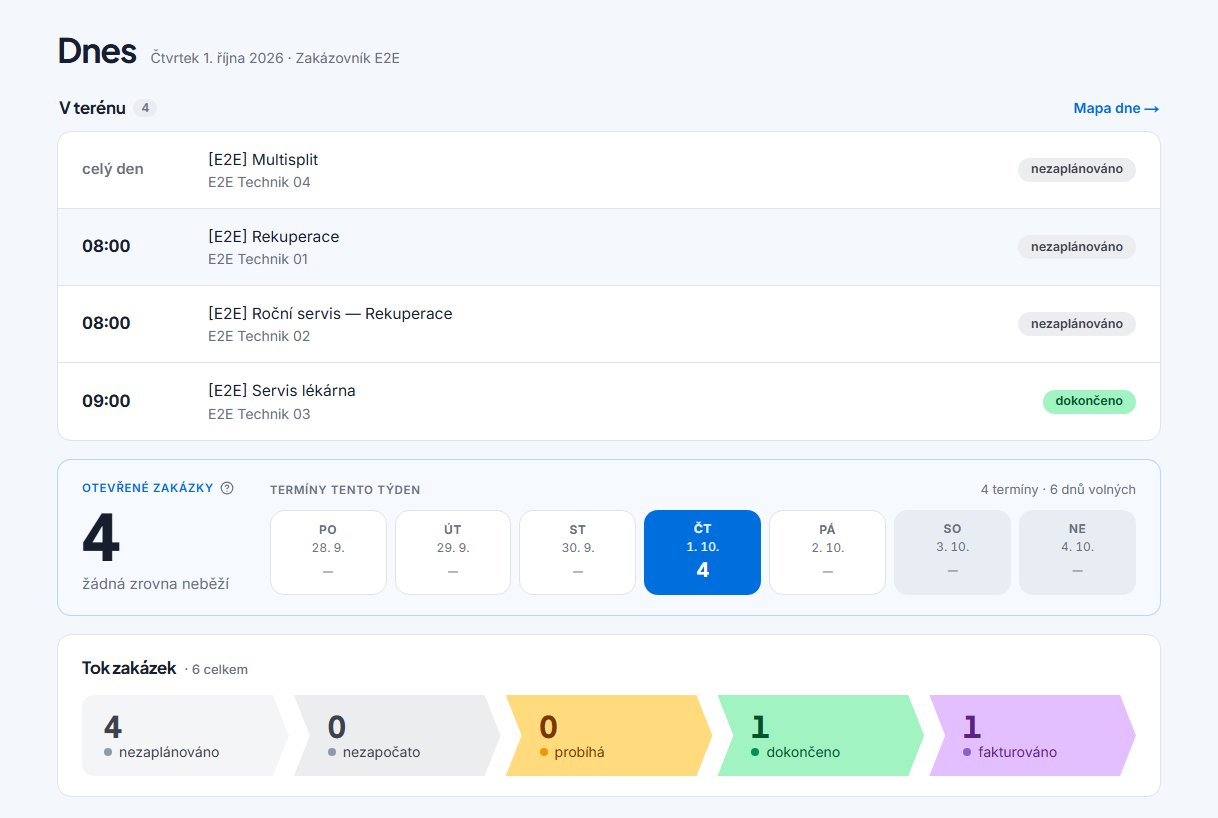
After logging in you see the whole day on one screen. The In the field strip shows today's site visits with the technician and the order status. Open orders tells you how much work is on the table, and next to it is an overview of the week's appointments. Order flow shows the counts from unscheduled to invoiced; click to open the orders in a given status.

Show detailsHide details

All-day site visits are at the top, the rest is sorted by time, and clicking a row opens the order. The Day map link next to the In the field strip shows today's routes on a map. Open orders count only unscheduled, not started and in progress; the ? icon next to the heading shows the breakdown by status. In the weekly overview today is in blue and a day with no appointment has a dash. When a customer cancels an appointment via the link or asks for a different one, a red Needs attention bar appears right at the top, together with their message.

The Today screen with today's site visits, the number of open orders and the order flow by status

September 2026

Order statuses as a traffic light

The colour in the calendar tells you at a glance what status an order is in. Every company has the same six statuses: unscheduled, not started, in progress, completed, invoiced and archived. Work in progress is amber, completed green and invoiced purple. Automatic status switching is optional and is turned on in Settings.

Show detailsHide details

A new order starts at "unscheduled" and, with automation switched on, moves along according to what happens in the field. "In progress" happens once the technician starts the work in the app; the appointment time by itself does not change the status. Invoiced and archived are always set by hand, and automation does not take an order back out of these statuses. A cancelled order is archived and can still be found in the order list using a filter. When you switch an order's status by hand, automation is turned off for that order so it does not overwrite your decision.

Equipment notes and equipment status right on the order

The technician and the office can both write a note on a unit, for example "the caretaker has the key", and next time everyone who goes to it will see it. A note can be general or tied to a specific service visit, and only what the technician ticks goes into the customer's report. The equipment card has a single history of inspection results and notes. The order overview has a new Equipment tab with inspection results, with no clicking through.

Show detailsHide details

The technician writes a note in My day with the Note button next to the unit, the office on the equipment card. For a fault or an inspection not done, the note is mandatory and always goes into the report. Every note shows its author, and if someone else edits it, who edited it as well. An inspection result keeps its original author, so who recorded what is not lost. Equipment with a note cannot be deleted, only retired, and the history stays.

Equipment records with inspection deadlines

Every boiler, air-conditioning unit, lift or fire extinguisher at a customer has its own card with a serial number and inspection deadlines. The overview shows what is overdue or due next, and an inspection order is created for the whole address at once. In My day the technician records OK, Fault or Not done for each unit and the results are carried over into the report. You will find it in the Equipment menu, with types and intervals in Settings → Equipment types.

Show detailsHide details

The deadline runs from the inspection actually carried out, not from the plan, so it only moves once the technician records the result. Equipment types can be created from templates (air conditioning, gas boiler, lift, fire extinguisher, electrical installation), including intervals according to the regulations. After an installation is completed, the app itself asks Add the equipment to the records?, so you do not forget the service visit. Equipment missing from the records is added by the technician directly on the order in My day. You can search by designation, serial number, customer and address.

A report that looks like your paper form

If your customers are used to your paper form, the report from ServisBook can look the same, box by box. The technician fills it in on the phone like an ordinary form, and the details from the order (customer, subject, hours worked) are pre-filled. We prepare the form based on your template. On a closed report the admin can add prices and rates from the office; a new version of the PDF is created and the previous one stays among the attachments.

Show detailsHide details

Pre-filled boxes are marked in the form with the "from order" label, so the technician knows what they do not have to write out. The page has room for the company logo and stamp too, just like on the original. The order of sections in the form can be set, so the technician sees their boxes at the top and the office has its boxes below. The form can also list the equipment on the order and the checklist items with their results. Adding to closed reports is switched on by the company in Settings → Service reports.

All service visits in one list

On one screen you see which service visit is due next and which is already overdue. The row colour tells you what to do: To schedule, Overdue or Scheduled. The Create order button prepares an order for scheduling. Automatic creation of orders overnight is optional and off by default. You will find it in the Service visits menu.

Show detailsHide details

The colour rule is simple: it has an appointment, it is blue; it has none and it is time, orange; it has none and it is already late, red. One row is one address with all its equipment and their inspections. The order is created for the whole address at once and also offers inspections whose deadline falls within 60 days, so they get done on the same site visit. The created order gets the "Service visit" label and drops into the queue of unscheduled orders. The list can be filtered by status, customer and date.

Set where each technician is allowed to write

Not every technician should be able to change other people's orders. For each user you choose the permission Technician – write everywhere, Technician – assigned only or Technician – read only. A technician with the "assigned only" permission does all the field work on their own orders (starts the work, logs tasks, fills in the checklist, gets the report signed) and only sees the other orders. It is set in the Technicians section.

Show detailsHide details

A "write everywhere" technician can do everything in day-to-day operations: orders, appointments, reports and planning. A "read only" technician has the app as an overview and changes nothing. Company settings and managing people stay with the admin. Removing the admin role has to be confirmed, and the app will not switch the last active admin to a technician. Nobody can change their own permission.

The customer signs the report with a finger on the phone

The service report is signed on site, with no printing or scanning. The customer and the technician sign with a finger on a phone or tablet, or with a mouse on a computer. The signature is placed in the PDF together with the signer's name and the date. On the report on the order, click Sign.

Show detailsHide details

Who signs the report (on behalf of the contractor, on behalf of the customer) is set by the report template. When signing, the signer's name is entered legibly and printed next to the signature. If needed, the signature can be taken again with the Sign again button. Closing the report freezes the PDF and later changes to the order no longer alter it. With automatic statuses switched on, a signed report moves the order to completed.

Service report on your company letterhead

The report the customer receives carries your company's logo, colours and footer. Just upload your letterhead once (PDF, PNG or JPG in A4 format) and every further report is typeset over it. The content of the report (tasks, checklists, photos, signatures) is filled in as before. You will find it in Settings → Service reports, Letterhead tab.

Show detailsHide details

The letterhead applies to the whole company, that is to all report templates. The PDF can have two pages: the first is used under the first page of the report, the second under all the following ones, exactly like ordinary letterhead. You set the margins in millimetres so the text does not run into the header or the footer. The Test PDF button generates a sample report with your letterhead, so you do not have to create a practice order. Changing the letterhead does not alter reports that have already been closed.

Photos on the order straight from the phone

The technician takes a photo of a nameplate or the finished work and the photo is on the order right away, with no forwarding. On the phone, the Attachments tab has a Take photo button; on a computer you simply drag and drop the files. You can upload several files at once, photos show as thumbnails and open full screen. You download all the order's attachments at once with the Download all button.

Show detailsHide details

The photo you take is attached straight to the order, without being saved to the phone's gallery. Photos are shrunk automatically before sending, so you do not have to edit them anywhere and they upload quickly even on a weak signal. When uploading several files, you can see the stage each one is at, and if one fails, the others carry on uploading. Besides photos you can also attach a PDF, for example a drawing or a delivery note. The bin always asks before deleting and shows the file name in the question.

Meetings, training and holidays go in the calendar too

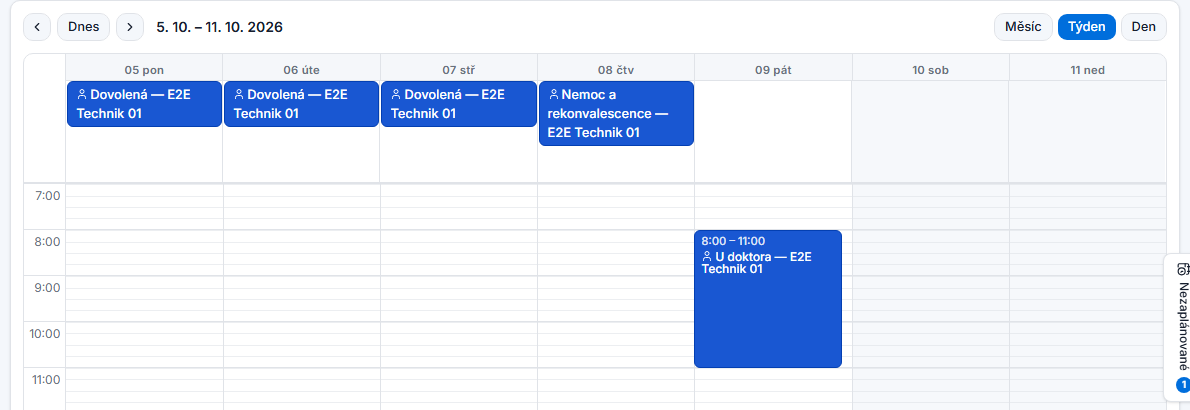
The calendar also shows the time when a technician is not working on an order: a meeting, training, car servicing, holiday or sick leave. Such an event takes up capacity, so the technician is not offered for scheduling an order at that time. In the New appointment dialog choose Not an order? Create an internal / personal event and fill in the name, who it concerns and the time. A technician with write access enters their own holiday themselves.

Show detailsHide details

You write the name yourself, for example "Holiday", "Sick" or "At the doctor's". An event can last a whole day, several days in a row, or just a few hours, and you can add a note to it. In the Calendar, Schedule and Technician plan it is drawn as a blue block with a person icon and the name; click it to edit or delete it. When you create an appointment for the technician at that time, the app warns of a clash with the name of the event. It does not stop you scheduling it, though, because the dispatcher sometimes knows more than the plan.

A week in the calendar with a holiday and a doctor's appointment as a technician's personal events

Try it yourself

ServisBook free for 30 days, no credit card.

Free trial →
Free for 30 days · no credit card